
Believe it or not – this is by far the MOST asked question from Crafts Capitol customers 🙂
And the answer? Depends.
The best way to find out if a certain foot is right for your machine, is first you need to understand what sort of sewing machine you’re trying to fit.
Does your machine have a Low Shank or High Shank?
First, consider the “Shank Height” of your machine, because there are TWO variations: 
That means if you don’t know what sort of shank your machine has, chances are it’s a LOW shank. Because High Shank machines are generally “fancy” embroidery models which are more costly, and those who invest in these models tend to know exactly what shank type it is.
Besides shank height, some machines are more specific with what foot they can take. Most Bernina and Janome Horizon models, for example. We’ll talk about those another time.
And this is important because….
Some presser feet are designed to be fastened directly onto the shank, with the thumb screw, as opposed to simply being “snapped” onto the foot adaptor like most feet that came with your machine. Walking foot is a classic one in this category – and knowing the right shank height means you get it right from the start.
————-
We are happy to inform you that we also offer Foot Adapter for Low or High Shank Machines that will resolve your concerns for snap-on presser foot products:
CraftsCapitol™ Premium High Shank to Low Shank Snap-On Adapter
Link: CraftsCapitol™ Premium High Shank to Low Shank Snap-On Adapter – Crafts Capitol
CraftsCapitol™ Premium Snap On Low Shank Foot Snap-On Adapter
Link: CraftsCapitol™ Premium Snap On Low Shank Foot Snap-On Adapter – Crafts Capitol
As for Bernina Machines, typically it will need an adapter for it to work as it’s a special machine. We have CraftsCapitol™ Premium Bernina Adapter (for low shank machines such B215, Activa 125, Activa 125S, Activa 135, Activa 135S, Activa 145, Activa 145S, Activa 210, Activa 220, Activa 230, Activa 230PE, Activa 240, Artista 200, Artista 730, B330, B350, B350PE Patchwork Edition, B350SE Best Friend, B380). Please click here for more information about the adapter:
CraftsCapitol™ Premium Bernina Adapter – Crafts Capitol
Hope this clears up a few things you might be wondering about sewing machine foot!
—————–
Is it a Top Loading or Front Loading Machine?
(Not to be confused with washing machine. Got it?)
What it means by “Top-loading” or “Front-loading” actually refers to the bobbin position.
A “Top Loading” machine has a “drop-in” bobbin, where the bobbin goes in from the top, directly underneath your needle and presser foot. The lid is usually clear so you can see the bobbin.
This type of mechanism is called “Horizontal Full Rotary Hook”, where the bobbin is driven by the machine to go round and round in full circle movements. Horizontal refers to the bobbin position – it sits horizontally in your machine and faces up. 
A “Front Loading” machine has a different spot for your bobbin. It is hidden behind the storage box, inside a trap door. You cannot see the bobbin at all until you open the trap door – and then you will see a metal bobbin case, which is removable. You filled bobbin goes inside this metal case.
This type of mechanism is called “Vertical Oscillating Hook”, where the bobbin goes side to side instead of completing a circle. The bobbin stays vertical inside the bobbin case.
Of course, there is another type of machine called “side-loading”. They are not all that common these days so chances are your machine isn’t one….

So, why does it matter?
You might be thinking: what’s the position of bobbins got to do with what foot I can use?
And you’d be right. It doesn’t matter, in most cases anyway.
What it means is that certain presser foot may have specific alignment for one type or the other. That means the needle position of the machine may not line up with the slot on the foot.
And if this ever happens, all you need to do is adjust your needle position to the left or right, and you’d be fine. The alignment issue only becomes a problem if your machine does not let you adjust needle positions. For example, the Janome JR1012 only has two needle positions, so you cannot fine-tune the needle to line up with the foot, and therefore getting the correct foot in the first place is important.
What’s your machine’s Maximum Stitch Width?
(this means how far your machine can zig and zag, when doing a zigzag stitch!)
Most domestic sewing machines have either “7 mm” or “5 mm“. Some high-end models have 9 mm but they are the exception rather than the rule.
Generally speaking, the mid-to-high range machines are commonly 7 mm. Janome DC4030 & DC2050, or even MC5200, belong in this category. Lower price range tend to have 5 mm as the norm. Janome JR1012 & RE1306 for example.
To determine yours, simply grab a ruler and measure the needle slot of your machine, like this: 
And what’s this got to do with foot?
A lot, actually. But that depends on which foot.
You see, if the foot is design to fit a 5 mm machine, and your machine can go as far as 7 mm, then your needle may well hit the foot!
Having said that, most of the presser foot that I’ve tried and tested are fine with either machines, which means you have a perfectly good chance of getting the foot you want, to fit the machine you have (and check with me if you’re unsure).
Now, let’s look at the presser foot you’re interested in:
Is it a Clip-on (or Snap-on) Foot? Or a Screwed-on Foot?
Now let’s look at how to install the foot….
A snap-on foot is used in conjunction with the foot adaptor – and simply ‘snaps’ into place. Your machine probably has one of these (or similar): 
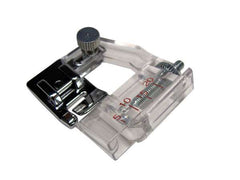
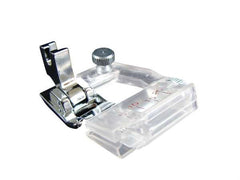
And to install a screw-on foot, you need to use a screwdriver (the one that comes with your machine is fine) to undo that screw on the side of the Foot Adaptor (see diagram below) 

Now, your machine will now look something like this – ready to fit your screw-on foot! 
To sum it all up….
Generally, Japanese makes – such as Janome, Brother, Singer or Elna – are easy to find universal presser foot that fit. European makes such as Pfaff and Husquavarna Viking generally need a universal foot adapter. The trickiest of all are Bernina (not Bernette) and Janome Horizon – or anything that has AcuFeed. If you have these machines, ask me separately.

That was very helpful thank you!
Will this fit my new home memory craft 8000 with the high to low shank adapter?